Sunday, October 30, 2011

Extra, Extra!! Newsletter Now Available!


I've decided to create a newsletter for my crafty interests :) I really wanted to combine my love of writing and crafting, and I think that my very own newsletter is a great place to start! Each month's newsletter will have a tutorial on a cool crafty project, an artist\crafter profile, shop updates, and much, much more! Reply to this or email me at sugarshoxcrafts@live.com if you'd like to receive my monthly newsletter or be a feautured artist! I'll also be offering discounts and coupon codes on each newsletter, as well!

Friday, October 21, 2011

Oct\Nov Newsletter Tutorial: Fringed Fleece Blankets

Here is the first tutorial for our first newsletter! Each newsletter's tutorial will be posted on my blog.


Some call them fringe blankets, some call them knot blankets and some others call them plain old fleece blankets. Ever wondered how to make one? I developed this tutorial from my own special "recipe" of creating the blankets. I was a bit frustrated by having to ask for measurements at the fabric counter each time I would go to make these.

Measurements from these instructions will make a baby or cat-sized blanket. The blanket that is shown in the tutorial was made for my son-to-be. Larger blankets for adults or dogs are made in exactly the same way--just replace the baby measurements with the measurements listed at the end of the tutorial. Happy crafting!


1. Get two pieces of fleece that are about 1.25 yards in length.


2. Place the first piece of fleece FACE DOWN on your work surface. Place the second piece of fleece on top of the first piece with the design facing UP towards you. Line up the edges as best as you can.


3. Cut off any borders or rough edges from fleece. Cut edges so that top and bottom are somewhat even.

4. Measure a 3" square on each of the four corners of the fleece.


5. Measure 3" in from the edge of the fleece, and draw a line with crayon or marker at the 3" mark. Draw the line all the way down the side of the fleece.


6. To make the fleece fringe strips, measure 1" in from the side of the corner square. Mark with crayon. Repeat this all the way down the side of the fleece until you've reached the next corner's square.


7. Cut fleece up to the 3" line you drew in Step 5. Repeat this cut for all the lines you made in Step 6, all the way down the side until you reach the next corner's square.


8. Tie top fringe piece to bottom fringe piece using a DOUBLE KNOT. Double knotting is very important as it makes sure the fringe will not untie eventually with use. Repeat this step all the way down the side of the fleece for all the fleece strips.


9. Repeat steps 5-8 for all 3 remaining sides.

10. You're done, and you now have a warm & cuddly blanket! Unfortunately, these kind of blankets aren't really that photo-op friendly :(


MEASUREMENTS FOR ADULT\LARGE DOG BLANKETS:
-Use a 2.5-yard length of fleece for each side. (Step 1)
-Cut 4" corner squares on all four corners. (Step 4)
-Cut 4" into sides for the cut "baseline". (Step 5)
-Cut 1" wide fleece strips for fringe. (Step 6)

Sunday, June 19, 2011

UPDATE: Walmart's Craft Department


Better than bacon and eggs TOGETHER! The full service craft department in my Walmart will stay!


The full service fabrics and crafts department in my Walmart store (Niagara Falls Boulevard in Amherst, NY) will STAY!!! A "source" I talked to there said that Walmart listened to its customers and decided to keep the department after lots and lots of people called Corporate's customer service to complain.

The department will also be in the new store that will be built to replace this current store too, the source told me.

This is really surprising to me because mostly all the craft departments in the stores in my area have closed or were consolidated into a limited selection and pre-cut fabrics (at one of them--the Supercenter in Niagara Falls--I can't even find colored zippers because of the limited selection). Also, very rarely do I ever hear about a big company (especially as big as Walmart is) actually listening to their customers. Wow! I really have a lot of goodwill towards Walmart now!

It's really a good thing because in my area there just aren't a lot of places you can buy fabric at, and even less if you don't have a lot of money to fork over for the fabric. You've got JoAnn's, Hobby Lobby and a couple independent stores. Hobby Lobby's prices are very high and so are the independents--as much as I want to shop the independent stores, I don't have $15 for one yard of fabric. That leaves just JoAnn's and Walmart as your budget-friendly options, and with JoAnn's you have to use a coupon to get the best prices too.

Have any WM craft departments around you stayed full-service?

Friday, May 27, 2011

Lessons Learned From My First Craft Show


This spring, I had the honor to display my work in the Artist's Alley of a big fantasy and video game convention at a university in my city. I made about 30 Nintendo cartridge purses for my table in both large and small sizes. I also handsewed about 10 vinyl recycled Ramen noodle wallets.


I had LOTS of people looking and complimenting, but had NO sales for the entire show. Pretty frustrating, eh? Especially when you consider that I spent almost every spare second I had for a month preparing (and about $300 in materials too). Craft show veterans say that every show is a mixed bag--some you get tons of sales, others you don't get any--but I was frustrated over this for quite some time. Luckily I had many online customers to boost my confidence afterward :)

Anyhow, I've learned from this show. Here's what I've learned (and you can too!):

1. Keep smiling no matter what at your table. Nothing's selling and you're frustrated and bored. The last thing you want to do is smile--not so fast Jethro! You never know who the next sale might come from. Plus you must also be a good sport for the image of your business as a whole. You want people to take your card or flyer and remember to visit you after the show. If you're a Grumpy Gus, customers can perceive you as having an attitude and definately WON'T come back then. I put my big girl panties on and smiled and spoke with good humor the whole time. I waited till me and my gear were safely in the car--and then I bawled my eyes out.

2. During the show, pay attention to what seemed to grab the customers' interest.
If nothing at all, this is what I love craft shows for--instant critiquing and market research--even a no sale show like mine came out with some good data to use for next time. For example, I learned that a certain line of vinyl bags that I make are not really in demand, so I will put them much lower on the priority list for making and/or possibly stop making them. This helps me to focus my creating on things that actually have a chance to sell :)

3. Sit down with a notebook and record your observations of the show you attended.
This is probably the best thing you can do after any show. Sit down and write out what happened at the show. It will help you mentally organize and can help you think of ways to improve for the next show or even your business in general. Make a chart showing what sold or had a lot of interest in, and also what didn't sell and what people didn't really seem interested in. This can help you find items that you can focus less on so that you can work more on items that have more of a chance of bringing you success in the future. Not too many people took your promo flyers or postcards? Note that too and you can save yourself some money on those things if you do a show later on by not buying them again. If you haven't run out of these things, do put them on your next table--never waste!

4. Have at least one low price point item.
Don't sell yourself short at your table--but don't price yourself out of people's leagues either. People from many different financial situations are probably coming to your show, so cater to everyone's budget by having at least one lower priced item--around $5. Figure out an item you can sell for that price that requires minimal labor and materials. This is one of the things I did wrong at my table. My lowest priced item was $20. At this particular show, many of the vendors around me were selling things around $5-$10, so I was beat out on that aspect. People would come on over to my table, marvel at my bags, and put them down. They thought my items were too expensive. I'm still working on that super low price item--I think it may a small wallet of some kind that I can sew up with my machine--minimal labor, minimal time to make the item, but still at a good price for the customer...EVERYBODY wins :)By all means, again, do NOT sell yourself short! Don't mark down your regular stuff to bargain basement prices--you'll just lose the labor and material investment you put in.

These are a few things that I'm going to think about before and after every show, shoud I decide to do more. At this point I may not, because I missed my son too much :) I did have a fun time schmoozing with my fellow crafters though. As disappointing as the show was sales-wise for me, at least this guy was around:

Tuesday, March 22, 2011

Mystery Meat Monday Recipe 1: Peanut Butter Creamy Pie


Our first recipe is Peanut Butter Creamy Pie from a recipe book called "Centennial Cook Book", which was put together by Cheektowaga (NY) Community Baptist Church. It appears to be from 1994. Well, not exactly vintage but it certainly smelled vintage--nice and musty. I guess that's what happens when books spend an unspoken amount of years in the very back of a used bookstore. Here's the book:


The pie certainly wasn't musty. It was amazing!! It had a very rich, smooth peanut buttery taste. This taste contrasted very nicely with the graham cracker crust as well. The filling was also of a pleasingly thick consistency. The best part of this pie besides the taste is that it required very simple, easy to find and cheap ingredients!! It called for cream cheese, peanut butter, vanilla flavoring, milk, powdered sugar, Cook Whip and the graham cracker pie crust. I had a lot of the ingredients already on hand, so all I had to really buy was the cream cheese, Cool Whip, and pie crust. Great deal!


Below is the making process...

Mixing the cream cheese and peanut butter. My measuring cup did not like the peanut butter one bit--it cracked right down the side.


Mixing the rest of the ingredients with the peanut butter and cream cheese. Might I say, that peanut butter and cream cheese together is the ultimate sit on the couch and eat treat--it's much better than ice cream.


Here are all the ingredients mixed together. I don't have a hand mixer at this time, so I had to mix it myself. It was a very thick batter so I ended up with very sore arms!


Spooning the very thick filling into the pie crust. I tried to pour it, but it was too thick to move. It also didn't want to come off the spoon, so I had to take big spoonfuls at once.


Got all the filling in, nice and evenly distributed throughout the crust. Swirled around the pie a few times with my spoon to make it look pretty.


I then put it in the refrigerator for about 4 or 5 hours (that's all my husband and I could stand waiting for it--we are total peanut butter nuts), and it came out gelled pretty solid. The color got a tiny bit darker too.


Ready to serve! I gave myself this special awesome cheese plate that I never get to use otherwise. Be careful when cutting it because the crust is very brittle. This is an awesome recipe to make for work parties or kids birthdays. It's easy to take places, and very quick to make! My pie took me about 15 to 20 minutes to make.

Wednesday, March 9, 2011

Mystery Meat Monday Retro Recipe Weekly Feature!

Introducing my Mystery Meat Monday Retro Recipe feature! I've got a huge collection of retro homemade cookbooks (the kind with the spiral binding that a lot of churches and organizations put together), and I will be cooking one recipe a week and publishing my results here on my blog! I've also always thought that those kind of cookbooks were like little time capsules and that we're missing out on a lot of tasty food by those recipes still being covered in dust.

My features will have plenty of pictures on the cooking process and a review of how each one tasted when it came out. These reviews will be honest not always flowery and congratulatory :)

Also be warned: I'm going to be choosing some off-the-wall recipes for my feature. Not ALL of them will be out of the ordinary, but many of them will be--what fun is it to keep making the same old thing time after time?

We'll start gently with a homemade take on peanut butter pie for the first week.

Now...ignore the "Monday" part...the recipes are all made on Mondays, but my little guy Cameron (he's almost a year old) doesn't like Mommy on the computer, so I have to find a half hour to steal and post. I will be posting one recipe & review a week, though, guaranteed.

A creamy and easy-to-make peanut butter pie will posted later today!

Tuesday, February 8, 2011

Making a Smart Business Card!


Sick of boring templates? I was too and thought it was time for a change from my Microsoft Publisher template-created business card. Ordering business cards was out of the question (I don't need to PAY for boring templates--especially the prices some of those companies want), but I still loved the smart and clean look of the business cards that a company called "Moo" makes. I also wanted to show off my products in the template. I futzed around with a few ideas and also happened to be posting my Etsy Mini on another website. A light bulb went off, and thus, my business cards were born!

Believe it or not, this uses Microsoft Word and the simple cut and paste function. Here's what you do:

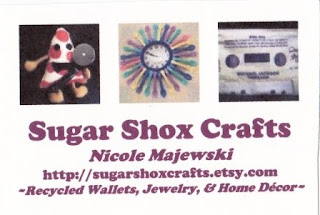
1. Make an Etsy Mini by going to the "Your Etsy" section of Etsy. Make sure you have a few items featured in your shop (starred) to do this.

2. Make an Etsy Mini with the following specs:
A. Use items from your shop.
B. Use thumbnail pictures.
B. Make the Mini have 3 columns and one row.

3. Highlight the Etsy Mini that the system generates. Include the pictures and also where it says "Etsy" and your username right underneath the pictures.

4. Open up Microsoft Word (I use Word 2003), right-click and paste the mini into the blank Word document.

5. Erase all the text underneath the pictures, if there is anything there (it will say your item's description, your username, and price). There may not be anything underneath the pics, so if not, just skip this step.

6. In the pasted document, erase where it says Etsy, and type in your business name. Use an attractive but professional font and color--I used Cooper Black in a soft purple.

7. Now erase the next line (it will say your username) and type in your name. Format this text all nice like we did in step 6.

8. Type in the addresses to your shop, studio, Facebook...whatever site it is that you want to get seen. Format this to be the same font as the other lines.

9. Type in a description of what you do or a tagline about your business, if you like. I typed in what I sell, "recycled wallets, jewelry, & home decor".

10. Highlight the whole thing (pictures and text), right click and choose "copy", and paste this underneath the original so you have about 4 cards per sheet.

11. Save your document and print using some nice heavy cardstock! Cut neatly down the sides and between the cards. A guillotine cutter would be a great help in doing this (too bad I can never find mine).
*****Keep in mind, your document is a Word document and not a photo, so if you want to post your card online for some reason, you'll need to scan a card first and use the image of that scan.

This card also gives you the flexibility to change up the items on your card--just go back to Etsy and feature some new items in your shop and follow these steps again. I love making my cards this way. I've been making them this way since September and they really don't seem to take too much time or printer ink (and I have the ink hog kind of printers too--no fanciness here :)). If you want to save on ink, you can always print the text in black instead of color, but the color is one of the things that draws your eye into these cards, in my opinion.

Happy crafting!!

Thursday, January 20, 2011

Just Say NO to Etsy Forum Reorganization!

I wasnt pleased to find out today that Etsy's forum reorganization plan is to continue. Important forums for critiques and techniques & materials are about to be shut down & converted to teams instead. This means in order to either get or give info you have to make a commitment to a team. I am part of many great teams but I dont think people should be required to do this simply to get information. It sounds like only exclusive people are allowed to get or give info which ruins objective speech in my opinion. Yes it's Etsy's site and they can do what they want with it, its just that actions like this ruin the free thinking advice that a lot of us on there like to use Etsy for.