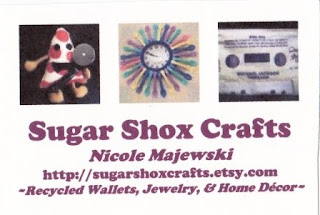
Sick of boring templates? I was too and thought it was time for a change from my Microsoft Publisher template-created business card. Ordering business cards was out of the question (I don't need to PAY for boring templates--especially the prices some of those companies want), but I still loved the smart and clean look of the business cards that a company called "Moo" makes. I also wanted to show off my products in the template. I futzed around with a few ideas and also happened to be posting my Etsy Mini on another website. A light bulb went off, and thus, my business cards were born!
Believe it or not, this uses Microsoft Word and the simple cut and paste function. Here's what you do:
1. Make an Etsy Mini by going to the "Your Etsy" section of Etsy. Make sure you have a few items featured in your shop (starred) to do this.
2. Make an Etsy Mini with the following specs:
A. Use items from your shop.
B. Use thumbnail pictures.
B. Make the Mini have 3 columns and one row.
3. Highlight the Etsy Mini that the system generates. Include the pictures and also where it says "Etsy" and your username right underneath the pictures.
4. Open up Microsoft Word (I use Word 2003), right-click and paste the mini into the blank Word document.
5. Erase all the text underneath the pictures, if there is anything there (it will say your item's description, your username, and price). There may not be anything underneath the pics, so if not, just skip this step.
6. In the pasted document, erase where it says Etsy, and type in your business name. Use an attractive but professional font and color--I used Cooper Black in a soft purple.
7. Now erase the next line (it will say your username) and type in your name. Format this text all nice like we did in step 6.
8. Type in the addresses to your shop, studio, Facebook...whatever site it is that you want to get seen. Format this to be the same font as the other lines.
9. Type in a description of what you do or a tagline about your business, if you like. I typed in what I sell, "recycled wallets, jewelry, & home decor".
10. Highlight the whole thing (pictures and text), right click and choose "copy", and paste this underneath the original so you have about 4 cards per sheet.
11. Save your document and print using some nice heavy cardstock! Cut neatly down the sides and between the cards. A guillotine cutter would be a great help in doing this (too bad I can never find mine).
*****Keep in mind, your document is a Word document and not a photo, so if you want to post your card online for some reason, you'll need to scan a card first and use the image of that scan.
This card also gives you the flexibility to change up the items on your card--just go back to Etsy and feature some new items in your shop and follow these steps again. I love making my cards this way. I've been making them this way since September and they really don't seem to take too much time or printer ink (and I have the ink hog kind of printers too--no fanciness here :)). If you want to save on ink, you can always print the text in black instead of color, but the color is one of the things that draws your eye into these cards, in my opinion.
Happy crafting!!